服务器安装
安装要求
操作系统
All major operating systems are supported, including Windows, Linux, and macOS.
环境
We strongly recommend using Yarn 1.x to run and build the Casdoor frontend. 使用NPM可能会导致界面样式问题。 欲了解更多详情,请见: casdoor#294。
If your network fails to directly sync Go dependency packages successfully, you need to use a Go proxy by configuring the GOPROXY environment variable. 我们强烈建议使用: https://goproxy.cn/
数据库
Casdoor使用 XORM 与数据库进行交互。 Based on Xorm Drivers Support, Casdoor currently provides support for the following databases:
MySQLMariaDBPostgreSQLCockroachDBSQL ServerOracleSQLite 3TiDB
下载
Pre-built Binaries
Starting from recent releases, Casdoor provides pre-built binaries for all major platforms. This is the fastest way to get started if you don't need to modify the source code.
Download the latest release from GitHub Releases. Each release includes binaries for:
- Linux: x86_64 and arm64 (
.tar.gz) - macOS: x86_64 and arm64 (
.tar.gz) - Windows: x86_64 and arm64 (
.zip)
After downloading, extract the archive and run the casdoor executable. The binaries include the web frontend and a sample configuration file (conf/app.conf). You'll need to configure the database connection before running (see Configure Database).
# Linux/macOS example
tar -xzf casdoor_Linux_x86_64.tar.gz
cd casdoor_Linux_x86_64
# Edit conf/app.conf with your database settings
./casdoor
Build from Source
Casdoor 的源代码托管在 GitHub: https://github.com/casdoor/casdoor。 转到后端代码和 React 前端代码都包含在一个仓库中。
| 名称 | 描述 | 语言 | 源代码 |
|---|---|---|---|
| 前端 | Casdoor的网页前端界面 | JavaScript + React | https://github.com/casdoor/casdoor/tree/master/web |
| 后端 | Casdoor的ResTful API 后端 | Golang + Beego + XORM | https://github.com/casdoor/casdoor |
Casdoor支持 Go Modules。 要下载代码,只需使用git克隆代码:
cd /文件夹路径/
git clone https://github.com/casdoor/casdoor
配置
配置数据库
Casdoor 支持MySQL、MSSQL、SQLite3和PostgreSQL。 默认情况下,Casto使用MySQL。
MySQL
Casdoor将会把users,nodes和topics信息存储在一个名为casdoor的MySQL数据库中。 如果数据库不存在,则需手动创建。 可以在以下位置指定数据库连接字符串 https://github.com/casdoor/blob/master/conf/app.conf
driverName = mysql
dataSourceName = root:123456@tcp(localhost:3306)/
dbName = casdoor
PostgreSQL
Before running Casdoor, you need to manually prepare a database for PostgreSQL, as Casdoor requires a database to be selected when opening Postgres with xorm.
假设你已经准备好了一个名为casdoor的数据库,你应该像这样指定app.conf:
driverName = postgres
dataSourceName = user=postgres password=postgres host=localhost port=5432 sslmode=disable dbname=casdoor
dbName = casdoor
dataSourceName有一个非空的dbName,并且也在上面的示例中为dbname字段复制数据库名称。 :::CockroachDB
CockroachDB也可以与PostgreSQL驱动程序一起使用,并且配置与PostgreSQL相同。
driverName = postgres
dataSourceName = user=postgres password=postgres host=localhost port=5432 sslmode=disable dbname=casdoor serial_normalization=virtual_sequence
dbName = casdoor
SQLite3
要配置SQLite3,您应该像这样指定app.conf:
driverName = sqlite
dataSourceName = file:casdoor.db?cache=shared
dbName = casdoor
Configuration Files
Casdoor can be configured via configuration files for both the backend and frontend. For a complete reference of all configuration options, see the Configuration File documentation.
For basic setup, you typically only need to modify driverName and dataSourceName in the conf/app.conf file based on your database (see Configure Database).
运行
目前有两种启动方法,您可以根据自己的情况选择一种。
开发模式
后端
Casdoor的Go后端默认在8000端口运行。 您可以使用以下命令启动Go后端:
go run main.go
服务器成功运行后,您可以开始进行前端部分。
前端
Casdoor的前端是一个非常经典的Create-React-App (CRA)项目。 它默认在端口7001上运行。 使用以下命令来运行前端:
cd web
yarn install
yarn start
在您的浏览器中访问 http://localhost:7001。 使用默认的全局管理员账户:built-in/admin登录Casdoor控制面板。
admin
123
生产模式
后端
将Casdoor Go后端代码编译成可执行文件并启动它。
对于Linux:
go build
./casdoor
适用于Windows:
go build
casdoor.exe
Frontend
将Casdoor前端代码构建成静态资源(.html,.js,.css文件):
cd web
yarn install
yarn build
在您的浏览器中访问 http://localhost:8000。 使用默认的全局管理员账户:built-in/admin登录Casdoor控制面板。
admin
123
要使用另一个端口,请编辑conf/app.conf并修改httpport,然后重新启动Go后端。
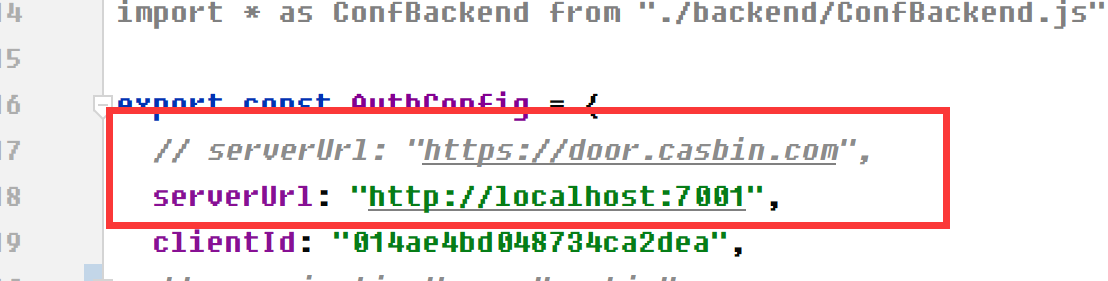
在dev环境中,前端由yarn run在7001端口运行,所以如果你想要进入Casdoor登录页面,你需要将Casdoor链接设置为http://localhost:7001。
在prod环境中,前端文件首先由yarn build构建,并在8000端口上提供服务,因此,如果你想要进入Casdoor登录页面,你需要将Casdoor链接设置为https://your-casdoor-url.com:8000(如果你正在使用反向代理,你需要将链接设置为你的域名)。
以我们的官方论坛Casnode为例
Casnode使用Casdoor处理身份验证。
当我们在dev环境中测试Casnode时,我们将serverUrl设置为http://localhost:7001,所以当我们使用Casdoor测试登录和注册功能时,它将会跳转到localhost 7001,这是Casdoor的端口。
当我们把Casnode放入生产环境时,我们将serverUrl设置为https://door.casdoor.com,所以用户可以使用Casdoor登录或注册。